Setup Service Principal & Users
AnomalyGuard signs people in with Microsoft Entra ID (Azure AD). You register one application in your tenant; that registration is used for:
- Browser sign-in to the web UI (OIDC)
- Tokens for the CLI and other API clients (same app registration)
- App roles that decide whether someone is an Admin or a User inside AnomalyGuard
Without this setup, users cannot authenticate. Entra roles are separate from Users data-view access: Entra decides who may enter and Admin vs User; AnomalyGuard then decides which data views they see.
| Role value (Entra) | Meaning in AnomalyGuard |
|---|---|
anomalyguard.admin |
Full administration (connectors, data views, users, API keys, filters UI, …) |
anomalyguard.user |
Data user — Home, results, own filters within assigned data views |
Licensing does not limit the number of users — see License.
Why you need this
- Identity — Entra is the source of truth for who can open the app.
- Authorization — tokens include the app role (
anomalyguard.admin/anomalyguard.user). AnomalyGuard reads that claim. - Credentials — the app’s client ID, tenant ID, and a client secret are required for AnomalyGuard and for CLI / automation that use Entra. You can still add API keys for integrations later.
Typical order of work:
Register app
  → Note client ID & tenant ID
    → Redirect URIs (web sign-in)
      → Client secret (required)
        → API permissions (Graph: sign-in profile)
          → Create app roles
            → Assign roles to users (Enterprise applications)
1. Register the application
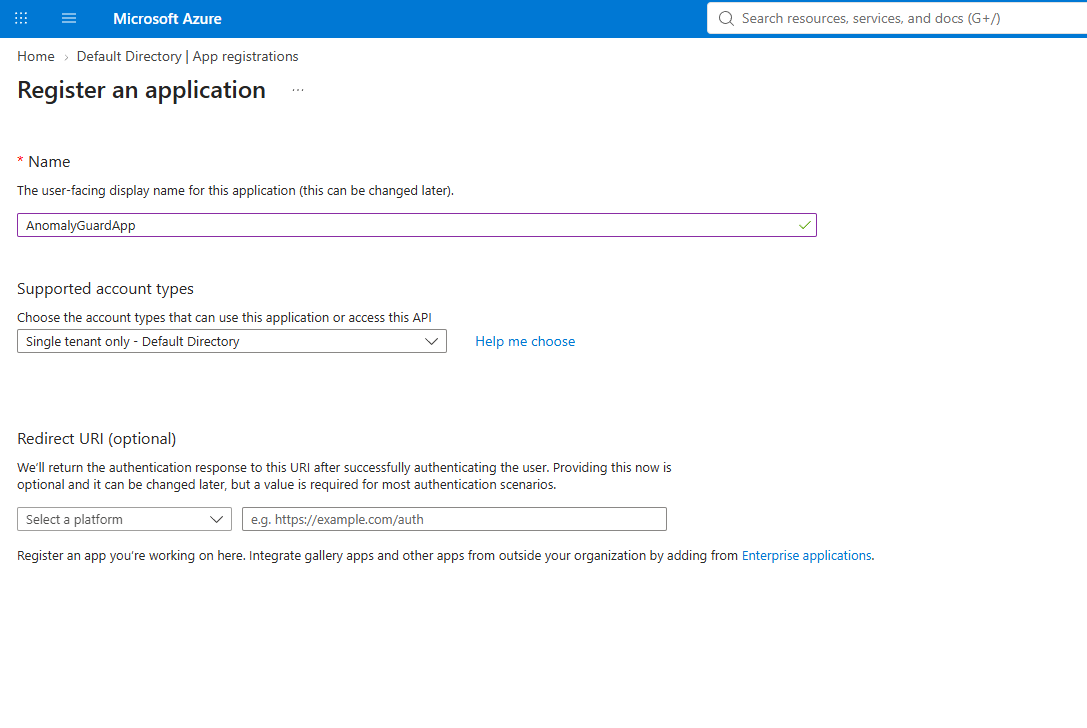
In the Azure portal go to Microsoft Entra ID → App registrations → New registration.
- Name — for example
AnomalyGuardApp. - Supported account types — usually Accounts in this organizational directory only (Single tenant).
- Redirect URI — you can leave this empty for now and add it in the next step.
- Click Register.
2. Copy the IDs (Overview)
Open the new app’s Overview page. Save these values for AnomalyGuard configuration and the CLI:
| Field | Use |
|---|---|
| Application (client) ID | App identity (ANOMALYGUARD_CLIENT_ID / appsettings) |
| Directory (tenant) ID | Your Entra tenant (ANOMALYGUARD_TENANT_ID) |
| Application ID URI | Often api://{client-id} after you expose an API |
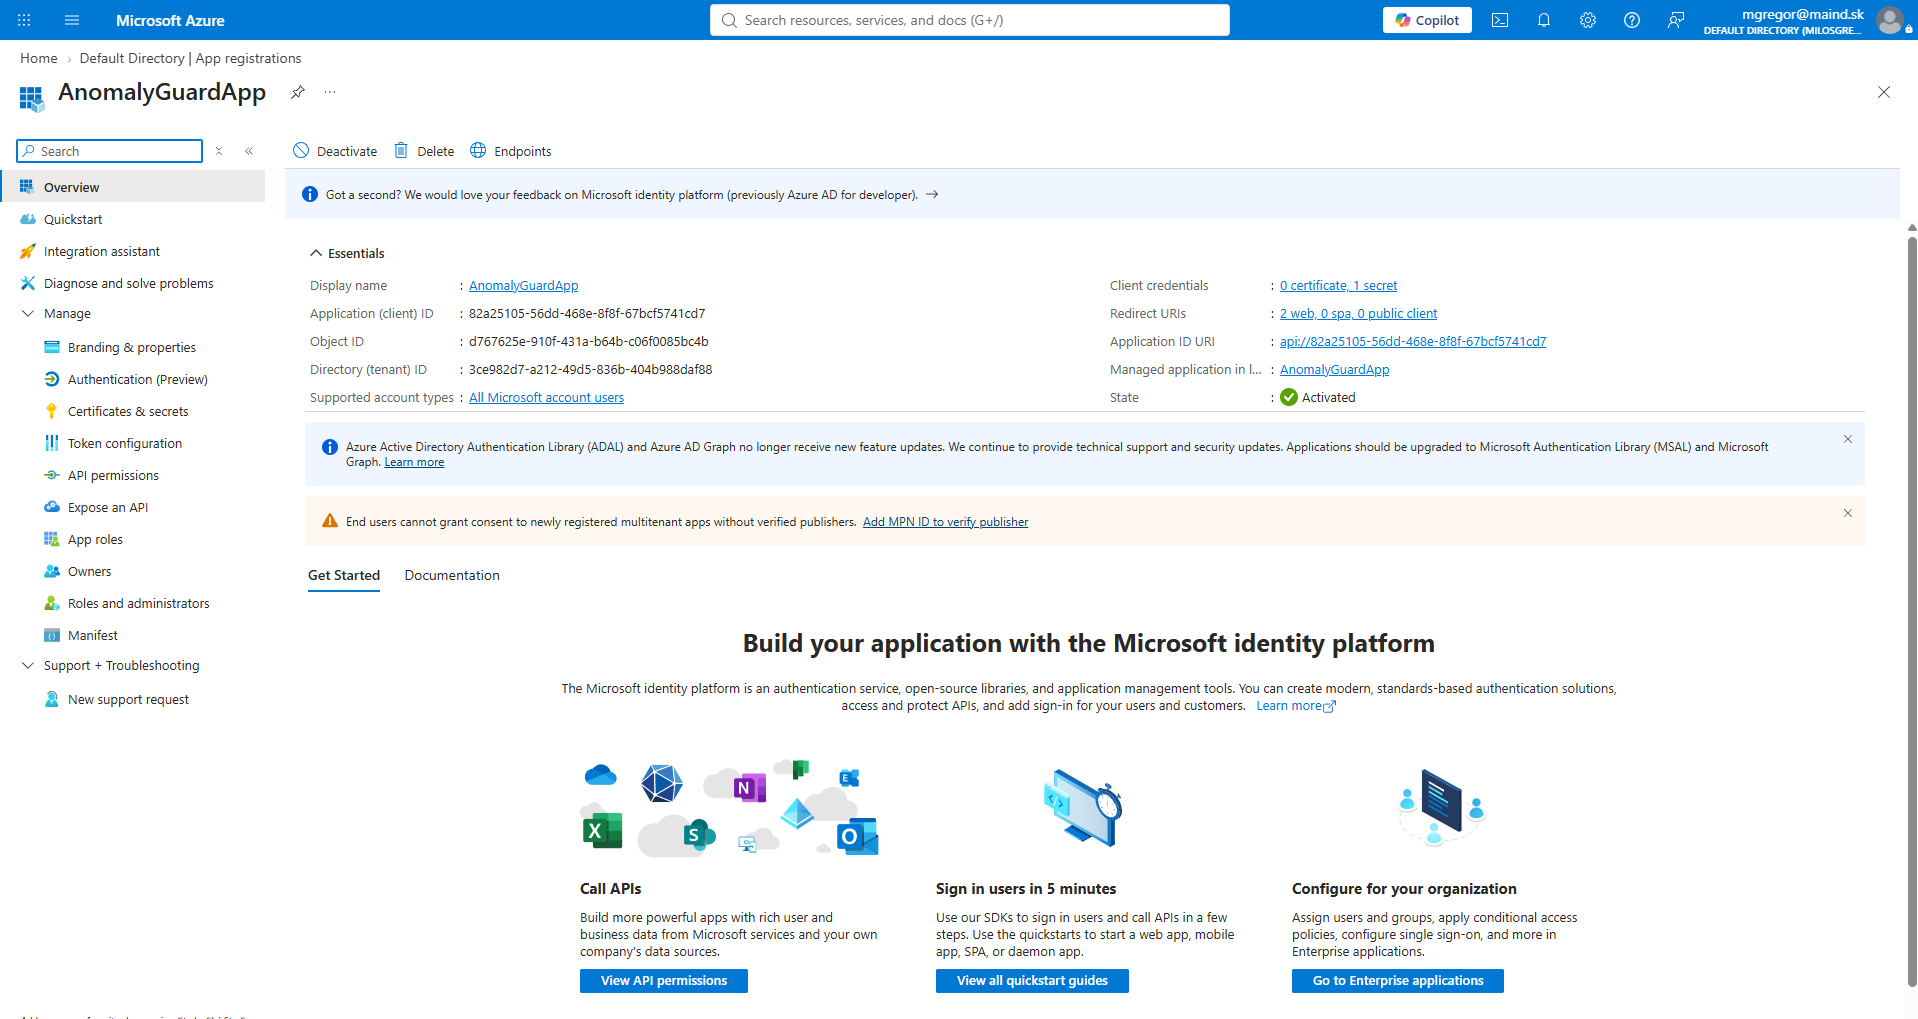
Also note the link Managed application in local directory — that opens the Enterprise application where you assign users later.
3. Configure redirect URIs (Authentication)
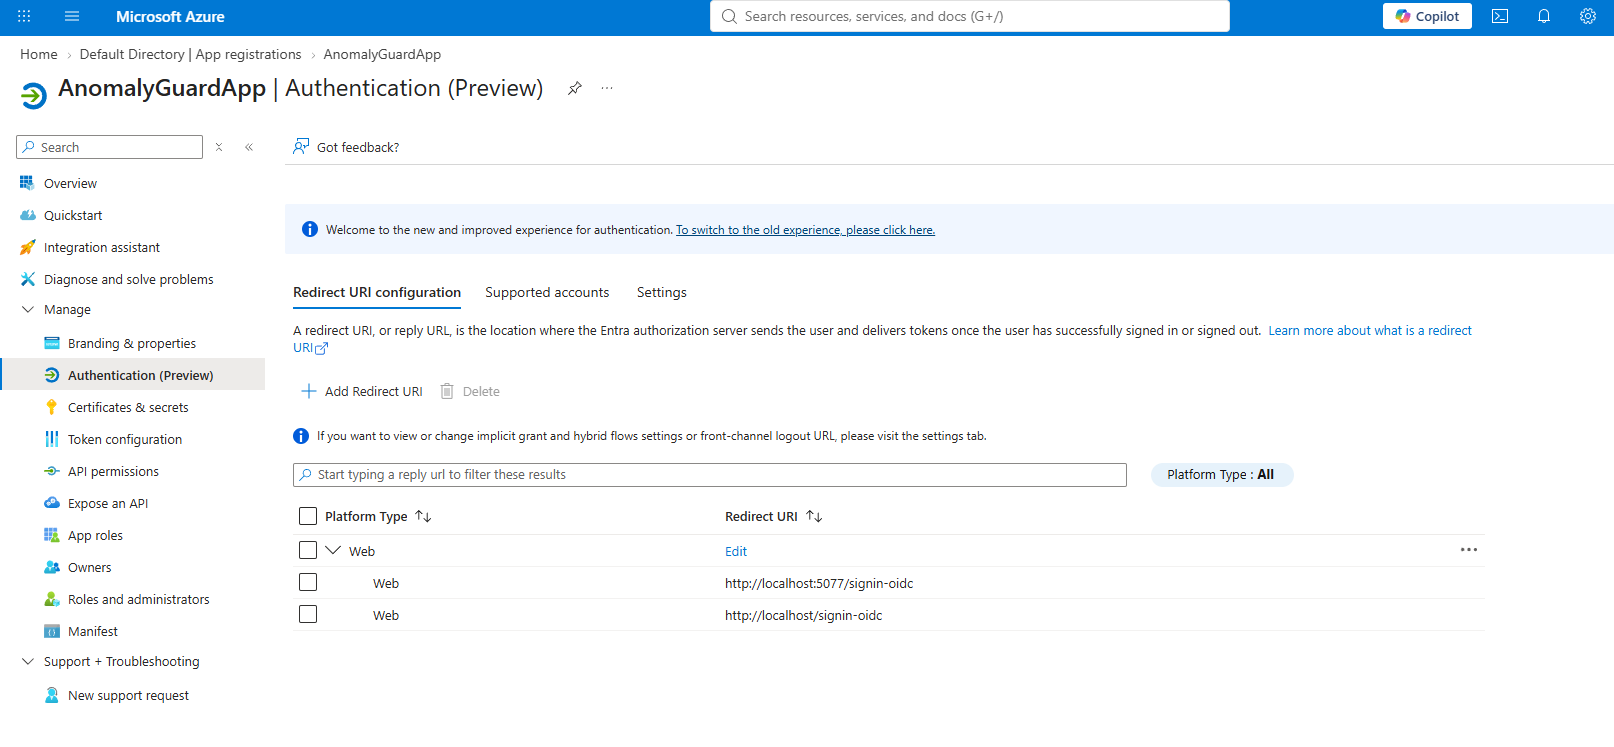
Open Manage → Authentication.
Add Web redirect URIs that match where AnomalyGuard is hosted. The callback path is /signin-oidc.
Examples from a local / container setup:
http://localhost:5077/signin-oidchttp://localhost/signin-oidc
For production, add your real HTTPS base URL, for example:
https://anomalyguard.contoso.com/signin-oidc
Click + Add Redirect URI, choose platform Web, save.
4. Create a client secret (required)
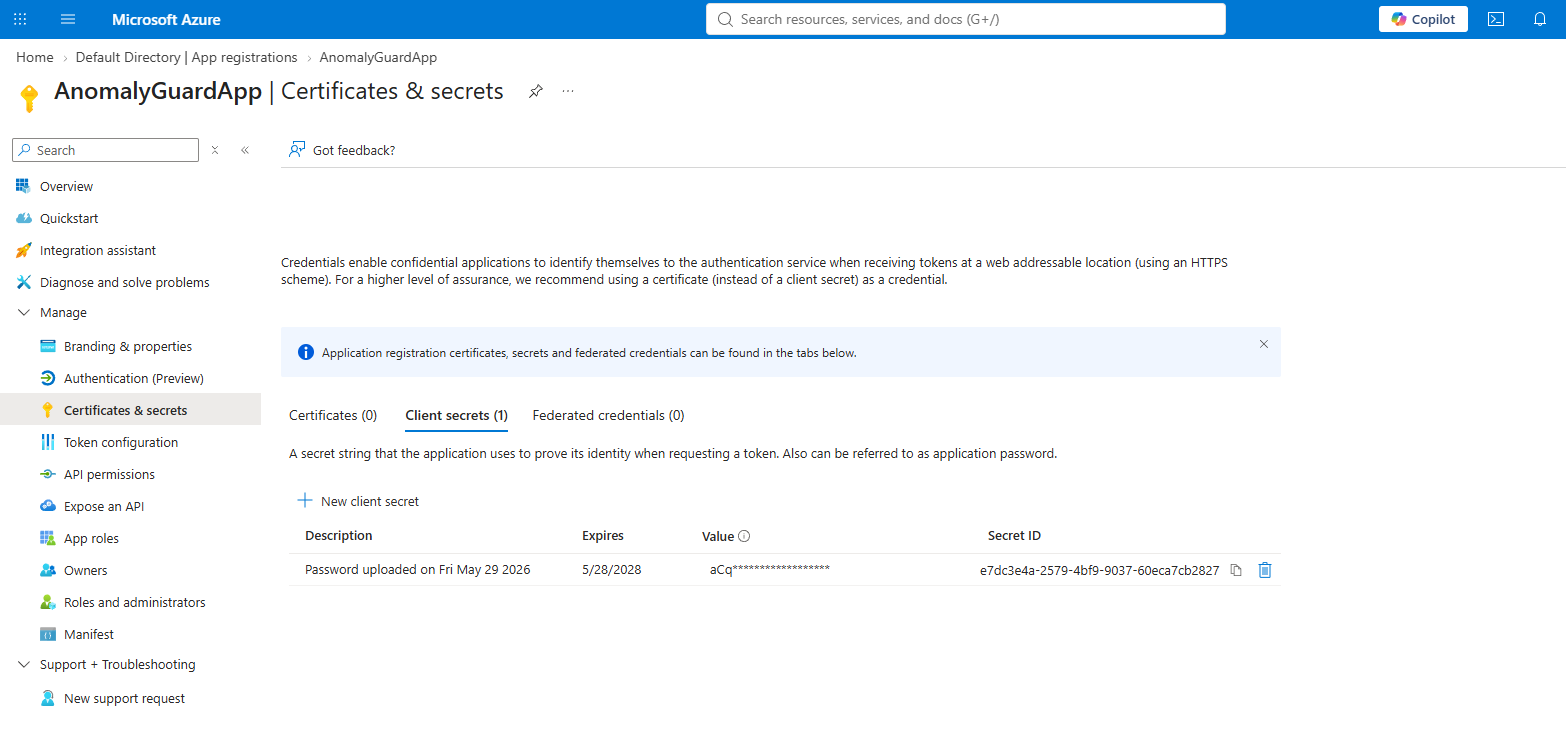
A client secret is required. Store it with the client ID and tenant ID in AnomalyGuard configuration (ANOMALYGUARD_CLIENT_SECRET / appsettings). Without it, sign-in and Entra-based CLI / automation cannot complete.
Open Manage → Certificates & secrets → Client secrets → + New client secret.
- Enter a description and expiry.
- Click Add.
- Copy the Value immediately — it is shown only once. If you lose it, create a new secret and update the configuration.
Rotate the secret before it expires. Treat it like a password: do not commit it to Git or put it in chat logs.
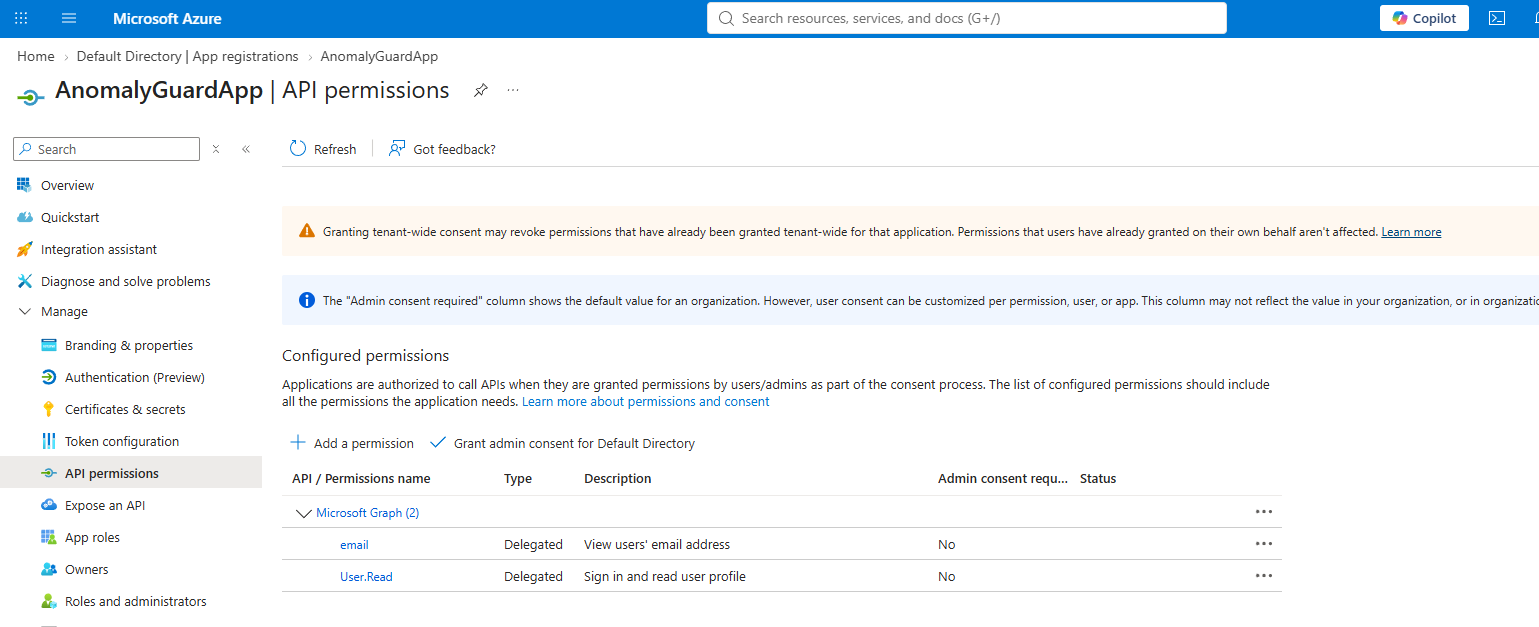
5. API permissions (Microsoft Graph)
Open Manage → API permissions.
For interactive user sign-in, grant at least these delegated Microsoft Graph permissions (as in the screenshot):
| Permission | Purpose |
|---|---|
User.Read |
Sign in and read the user profile |
email |
View the user’s email address |
Use + Add a permission if they are missing, then Grant admin consent for {your directory} when your tenant policy requires it.
6. Create app roles
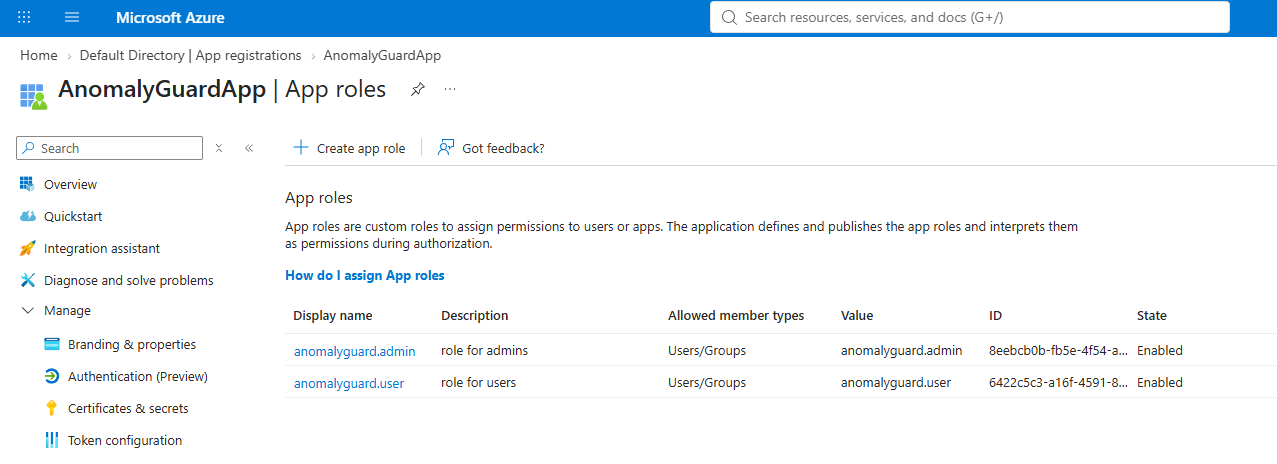
Open Manage → App roles → + Create app role.
Create two roles (names/values must match what AnomalyGuard expects):
| Display name (example) | Value | Allowed member types | Description |
|---|---|---|---|
| Admin | anomalyguard.admin |
Users/Groups | Role for admins |
| User | anomalyguard.user |
Users/Groups | Role for users |
Enable both roles and save.
Important
Roles are defined on the App registration. They are assigned to people on the Enterprise application (next step). Creating the role alone does not grant anyone access.
7. Assign a role to a user
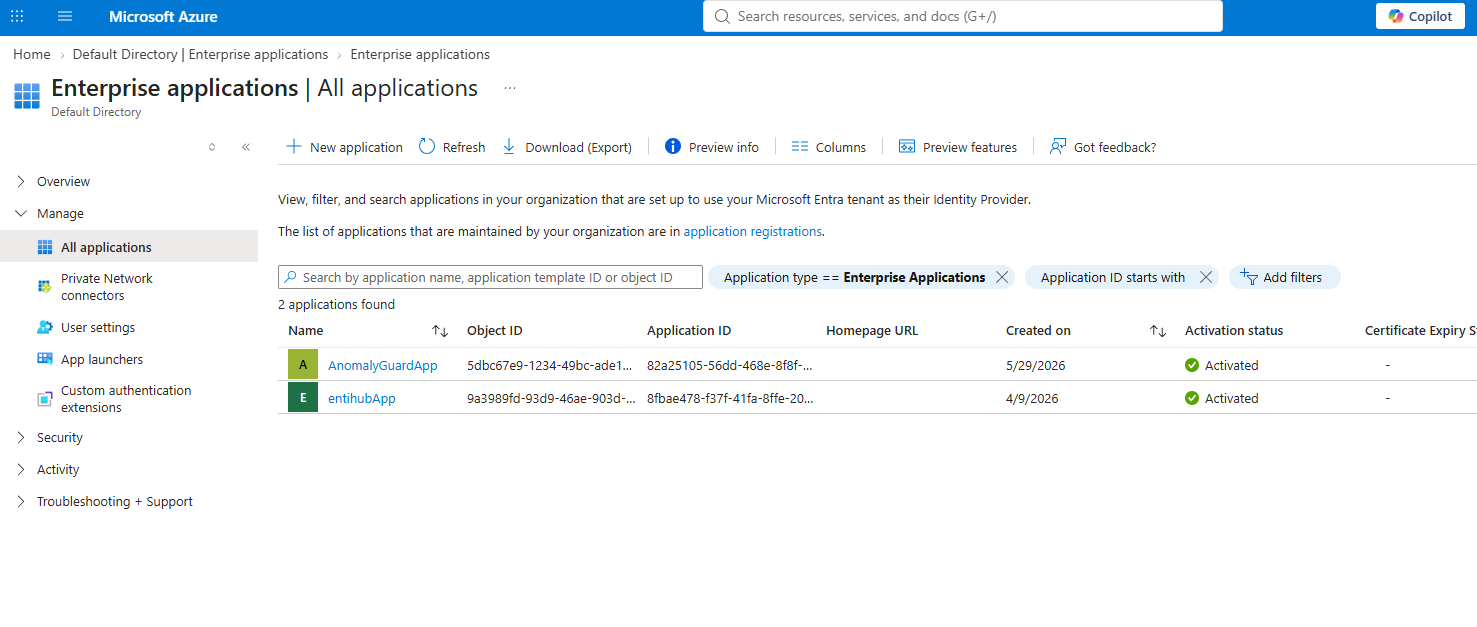
Open the Enterprise application
Go to Microsoft Entra ID → Enterprise applications → All applications, then open AnomalyGuardApp (same application as the registration).
Users and groups
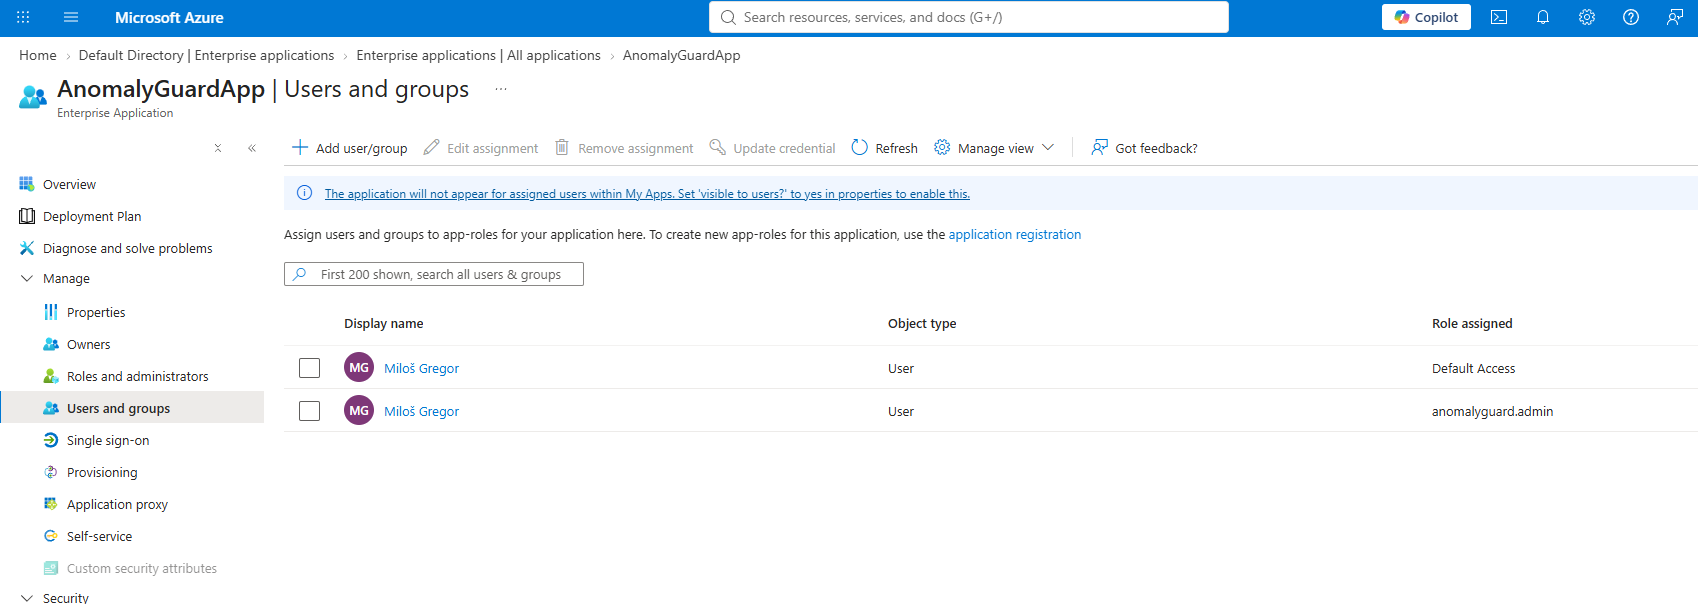
Under Manage → Users and groups:
- Click + Add user/group.
- Select the user (or group).
- Select the role —
anomalyguard.adminoranomalyguard.user. - Assign.
The assignment list should show the person with the chosen role (for example anomalyguard.admin). You may also see a Default Access row; the important claim for AnomalyGuard is the explicit app role.
Repeat for every person who should sign in. Give at least one administrator anomalyguard.admin before go-live.
After Entra is ready
- Put tenant ID, client ID, and client secret into AnomalyGuard configuration.
- Sign in to the web UI as an admin.
- On the AnomalyGuard Users page, assign data views to each person so they see data on Home.
- For pipelines and agents, create API keys or configure the CLI.
Checklist
- [ ] App registration created (single tenant)
- [ ] Client ID and tenant ID recorded
- [ ] Redirect URI(s) end with
/signin-oidcand match the deployed URL - [ ] Client secret created and stored in configuration (required)
- [ ] Graph permissions
User.Read(+email) consented - [ ] App roles
anomalyguard.adminandanomalyguard.usercreated - [ ] At least one user assigned
anomalyguard.adminunder Enterprise applications → Users and groups - [ ] Analysts assigned
anomalyguard.user(or admin) as appropriate - [ ] Data views assigned inside AnomalyGuard (Users)